I was looking for a good blogging platform and Ghost is a very good option! Azure has gallery image for Ghost, but there are few disadvantages of using gallery image
- If you want to customize the contents (for example theme) then its hard
- There is no functionality of adding comments
- No Google Analytics integration
- You can't add your new pages
- If you add some of the above functionality then you need to do that via FTP, there will be no auto deployment from source control
- There is no easy way to upgrade to newer version
So, if you want to overcome above issues then you need to fork Ghost source code and work on it!
There are a bunch of articles on how to do that, but some of them are old and some of them don't work on Ghost GIT fork. So, I thought I should document steps which worked for me.
Step 1: Fork Ghost repository
- Login to GitHub using your GIT credentials
- Go to Ghost repository https://github.com/TryGhost/Ghost
- Click on 'Fork' button
- Once Fork operation is done, you will see Ghost repository under your GitHub account
Step 2: Clone forked repository
Open Git command prompt on your machine and run below command (Assuming GIT is installed on your machine)
> git clone git@github.com:<Your GitHub handle>/Ghost.git
Step 3: Compile Ghost code
Please make sure that you have NodeJS installed on your computer. To check this open command prompt and run command node -v If it returns value then you are fine else you need to install node first
Run below commands to build the code
> npm install -g grunt-cli  // This will install Grunt
> npm install                // This will install all Ghost dependencies
> grunt init                // Compile JS and express web application
Step 4: Test locally
To test locally just run below command
> npm start // This will start node application
This will run an application in development mode and on port 2368. So, application URL will be http://localhost:2368
Step 5: Compile contents for Production
To compile files for Production, run below command
> grunt prod // Generates and minifies the JavaScript files
This will generate necessary files for Production
Step 6: Add config.js file
If your repository does not haveconfig.js file then copyconfig.example.js file and rename it toconfig.js.
Also, you need to update production settings from the file as follows
production: {
    url: '<YOUR WEBSITE URL>', // For example http://test.azurewebsites.net
    mail: {},
    database: {
        client: 'sqlite3',
        connection: {
            filename: path.join(__dirname, '/content/data/ghost.db')
        },
        debug: false
    },

    server: {
        // Host to be passed to node's `net.Server#listen()`
        host: '127.0.0.1',
        // Port to be passed to node's `net.Server#listen()`, for iisnode set this to `process.env.PORT`
        port: process.env.PORT
    }
},
Make sure that you are updating the port value to process.env.PORT. This is important Else it will NOT work after deployment to Azure.
Step 7: Add server.js file
Azure websites work on IIS, so to specify this is NodeJS application, we need to addserver.js file at the root. So, create a new JS file with nameserver.js and add below contents to it
var GhostServer = require('./index');
Step 8: Update .gitignore file
By default Ghost repository ignores below files which are required to run application correctly on Azure website
- config.js
- /core/built
- /core/client/assets/css
So, remove above lines from the.gitignore file
Step 9: Add 'iisnode' configuration file
When Azure deploys the application from GIT, it will create iisnode.yml file. If you want to tell IIS to capture the output and error messages, then you need to update this file. You can do this by connecting via FTP and modify the file. BUT I prefer to add that as part of a repository so that Azure GIT deployment will not override modified file after each deployment.
So, create file iisnode.yml at the root level. Add below lines in the file
loggingEnabled: true
devErrorsEnabled: true
logDirectory: iisnode
Now, IIS will create a directory with name iisnode and log output and errors.
Step 10: Commit & Push changes
After making all above changes, commit those and push it to GitHub repository. To do this run following commands
> git add .
> git commit -am "<Commit message>"
> git push origin master
Step 11: Create Azure website with GIT deployment
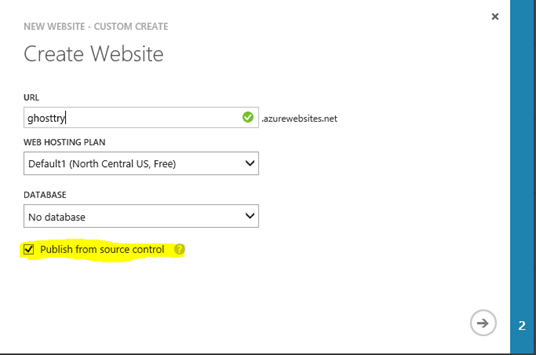
- Choose 'Custom Create' option for website. So that we can configure GitHub for deployment

- Enter unique website name & check 'Publish from source control' checkbox

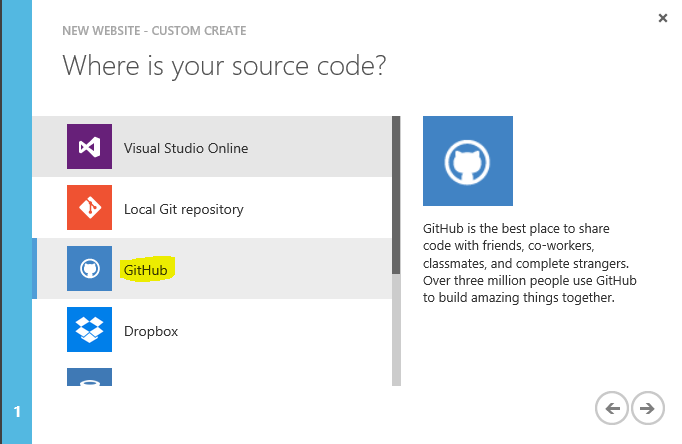
- Select 'GitHub' option

-
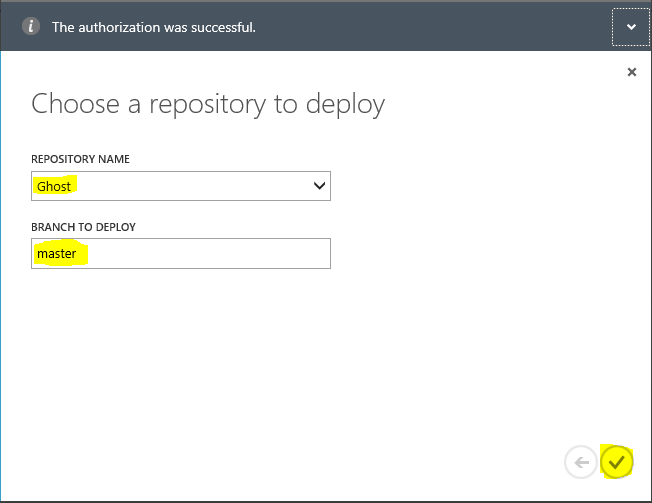
Enter your credentials and GitHub will show you the repositories and its branches. Choose appropriate repository and branch

Click on 'Done' arrow
Deployments tab will now appear and Azure website will start the deployment. Once deployment is done it will show successful message like

Step 12: Change Website configuration
We need to set NodeJS configuration variable in website configuration. To do this click on Configure tab in Azure website and scroll down to app settings section. Add app setting with name NODE_ENV with value production
Settings will look like

DON'T miss to click on Save button at the bottom & restart the website
YOU are ALL SET!! Access your website now and Ghost should be running fine. If it gives HTTP 500 error, let's refresh one more time and you should be good to go!
After this whenever you make a change and push changes to the appropriate branch, Azure will automatically detect the changes and redeploy the website!
You have full control of Ghost now. You can update contents & add new pages using your favorite editor. You can now integrate comment provider of your choice and integrate Google Analytics too!
If you have any questions or face issues then please post them as a comment.
Happy Blogging!
