Sudarshan's Blog

My Thoughts, Findings & Experiences

SQL Azure Security: Transparent Data Encryption (TDE)

July 25, 2016 02:59

Transparent Data Encryption (TDE) keeps your data files and backups encrypted. TDE protects both physical data and transaction log files. If the files are moved to another server, those can’t be opened and viewed on other server. TDE protects data at rest while data tables are not directly encrypted. This means, if a user has permission to a database with TDE enabled, that user can see all the data. TDE was first introduced in on-premise version of SQL Server 2008.

SQL Azure TDE works similarly, but the configuration of is much simpler than on-premise SQL Server. Here is how you can enable TDE:

  • Go to Azure portal portal.azure.com
  • Choose your database and go to settings
  • Click on Data Encryption On option (Check the below screenshot)

Change the Data Encryption value to ON and Save (at the top right hand corner of the page). Check for the ‘Encryption Status’’, after a while it will say Encrypted.

TDE in SQL Azure is implemented on top of the same data transparency feature running since SQL Server 2008. Some enhancements are made to the core technology to reduce the CPU overhead caused by turning on TDE.

Few important things to note about TDE feature in SQL Azure:

  • There are NO CHANGES required in the application
  • It encrypts database using symmetric key, also called as database encryption key
  • Database encryption key is protected by built-in server certificate which is unique for each SQL Azure Database Server
  • If there are multiple databases on same server then same certificate shared by them
  • Built-in certificates will be changed by Microsoft after every 90 days for security purposes
  • If you have enabled Geo Replication on the database, then it is protected by different keys on different servers
  • SQL Azure does not support Azure Vault integration with TDE

If you want to implement stronger security than encrypting data at rest (TDE) then please read this article “Always Encrypted”.

SQL Azure Security

July 24, 2016 16:40

Some organizations are concerned about moving their data to the cloud because of perceived security risks and unfamiliarity with new security paradigms to DB administrators, programmers and application users. Most of the concerns can be addressed by the better understanding of security options available in Azure and SQL Azure.

Azure provides robust security protection and its datacenters are resilient to attack. Azure datacenters are compliant to various regulatory & security requirements like HIPPA, ISO & PCI to name a few and audited regularly. Microsoft uses built-in analytics and comprehensive methodology to detect and respond to malicious behavior within Azure. It’s important to note that, not all datacenters are compliant with all certifications, so choose Azure datacenter based on your requirements.

While Azure is providing secure platform for your data, its your responsibility to take steps to ensure application security.

In this article series, we will discuss different options available in SQL Azure to secure your data. Security can be categorized into below categories:

  • Data Access
  • Monitoring and logging
  • Data Protection

We will look at following features

Data Access

  • Restricting access using Firewall administration
  • Authentication
  • Managing Permissions

Monitoring and logging

  • SQL Azure Auditing

Data Protection

Once you have a good understanding of your application’s security needs, you can choose appropriate features or combination of features to secure your data.

Azure: Design for failure (Why?)

July 21, 2016 00:22

When applications are moved to the Cloud (in this case to Azure), people get perception that their applications are highly available and up all the time. Usually, most of the Azure services has SLA of 99.95% which also leads to the high availability perception.

Let’s consider a business scenario. Assume, we have an online shopping application deployed on Azure as Platform as a Service. Application consists of below Azure services

  • Azure Web App
  • SQL Azure
  • Blob storage

Conceptual architecture diagram of the application will look like this:

Azure Website Application deployment diagram

Assume application is deployed in the ‘North Central US’ Azure region.

What is wrong with this deployment? Everything should work fine and application should be available 99.95% of time. Here are few things to consider:

  • 99.95% uptime is for individual service.
    • This means if web app can be down for X number of hours and SQL database service can be down for Y number of hours. It’s NOT necessary both will down at the same time, they can be unavailable at different time
    • So, even though each Azure service is within 99.95% SLA, your application might have more downtime!
  • What if your web application has some edge case failures?
    • For example, your application has memory leak issue and in some edge cases, it gets restarted and after restart it takes few minutes to start serving requests.
    • Such scenarios might add up to application downtime
    • Consider such issues happening in busy season, which may give bad experience to your application users and might leave bad impression about your application
  • Application deployments
    • Releasing new features or bug fixes to Production will make application unavailable for deployment duration
    • Depending on how many times you do deployments, that time will add up to application downtime
  • Un-expected Azure issues may end up in application downtime

Because of above reasons, Design for Failure is important!

Let’s work on designing our application (above sample scenario) for failure. 

First step

Find out failure points. In the scenario, we have 4 failure points:

  • Azure Web App
  • SQL Azure
  • Blob storage
  • Application bugs

Second step

Find solutions for handling failures.

Azure Web App

Solution 1

You can have multiple instances of web app running in same region. This means running web app in scaled out mode. You can run Azure Web App on up to 10 instances within same region

  • Issues with this approach
    • If Azure region is having downtime then your application will face downtime

Solution 2

Deploy application in multiple region and manage traffic routing using Traffic Manager

  • Deploy application in other region (sister region). In our scenario, deploy web application to South Central US region
  • Use Traffic Manager to route users to appropriate instance of web application
  • Now even if North Central US region is having issue, user requests will be served from South Central US region. I will explain how to configure Traffic Manager below.

SQL Azure

  • Enable Geo Replication for SQL Azure database
  • Database is now actively geo-replicated to secondary region. Geo-replicated database is read-only
  • If primary region is having trouble, then make database from secondary region as primary (read/write) by stopping geo-replication. Connect application to database from secondary region.

Blob Storage

  • Choose your blob storage mode as ‘Read-Access Geo Redundant’ so that your blob storage content are actively geo-replicated to secondary region
  • In case of failure in primary region, you can connect applications to secondary region


After considering above solutions, newer application architecture will look like this:

 Azure Website Application-Highly Available deployment diagram

Traffic Manager

Traffic Manager is used to manage routing of application users between multiple Azure regions. Traffic Manager can be configured in 3 different modes:

  1. Failover mode
  2. Performance mode
  3. Round robin mode

In our case we will use Failover mode

Traffic Manager-Load balancing methods

Traffic manager needs ping URL to detect application is available or not. One ping URL can be configured per region.

Traffic Manager-Ping URLs

If Traffic Manager sees ping failures from Primary (for certain time ~120 seconds) region then it automatically diverts traffic to next secondary region. When it sees primary region is up then Traffic Manager will divert traffic back again to Primary region.

You can find more information about Traffic Manager here

Validation time

Let’s revisit some failure scenario:

  1. Azure Web App is facing issues
    • Traffic Manager will redirect traffic to secondary region
    • Once primary region is back then Traffic Manager will traffic back to primary region
    • So, we are covered
  2. SQL Azure service is facing issues
    • Stop the replication
    • Change database connection string to point to database from secondary region
    • So, we are covered
  3. Blob Storage is facing issues
    • Change connection string to use blob from secondary region
    • So, we are covered
  4. Application issues
    • This is the same scenario as Azure Web App is facing issues (#1)
    • Traffic manager will address this issue
  5. Application Deployments
    • You can deploy applications to one region at a time and avoid application downtime during deployments too

After designing for failure, you may notice that application uptime is drastically increased! Now, applications are resilient to the Azure failures as well as application failures.

Moving applications to Azure –> Think about Designing for Failure!

Managing Azure App Service Routing Rules

June 12, 2016 21:35

Azure web services has a very good and powerful feature: Traffic Routing. Traffic Routing allows you to test your production website with live customers!! (Is this true?). This feature allows you to test new version of your website with subset of live users, so that you can verify functionality, performance and bugs if any. If you see any issues then you can move traffic back to old site else you can gradually move users to the next version of application. This will allow you to do rapid deployments without application downtime.

One are use this feature, if Azure App Service is running in Standard OR Premium mode and web application must be deployed in one or more deployment slots. Traffic routing can be configured in 2 ways:

  1. Through new Azure Portal
  2. Using PowerShell


In this post, we will take a look at how to do traffic routing using Azure PowerShell. If you are planning to use automated release management, then PowerShell is the way. Here is how you can route traffic using PowerShell:


$RoutingRule = New-Object Microsoft.WindowsAzure.Commands.Utilities.Websites.Services.WebEntities.RampUpRule
$RoutingRule.ActionHostName = $ActionHostName
$RoutingRule.ReroutePercentage = $ReroutePercentage;
$RoutingRule.Name = "ProductionRouting"

Set-AzureWebsite $_ -Slot Production -RoutingRules $RoutingRule
 
Here is description of parameters:
  • $ActionHostName: Name of azure web service deployment slot
  • $ReroutePercentage: Percentage of people you wan to move to new deployment

You can opt for routing 100% traffic to new deployment OR you can move it gradually. Gradual traffic movement can be done using PowerShell as well:


# Below properties can be used for ramp up or ramp down
$RoutingRule.ChangeIntervalInMinutes = 10;
$RoutingRule.ChangeStep = 5;
$RoutingRule.MinReroutePercentage = 1;
$RoutingRule.MaxReroutePercentage = 80;

BUT, how to remove traffic routing rule?

Let’s say we want to move traffic back to old website. In this case to Production website slot. There is very less documentation available about how to remove traffic routing rule. I spend lot of time researching how to do this. Here is how it can be achieved


Set-AzureWebsite $_ -Slot Production -RoutingRules @()

This will remove the traffic routing rules that you have added.

Here is parameterized version of PowerShell script for traffic routing management

Param(
[string] [Parameter(Mandatory=$true)] $WebsiteName,
[string] [Parameter(Mandatory=$true)] $DeploymentSlot,
[string] [Parameter(Mandatory=$true)] $ReroutePercentage
)

Write-Host "$WebsiteName : Moving Traffic to Slot - $DeploymentSlot => Start"

if($DeploymentSlot.ToLower() -eq "production")
{
Write-Host "Removing Routing Rules"
Set-AzureWebsite $WebsiteName -Slot Production -RoutingRules @()
}
else
{
$ActionHostName = $WebsiteName + "-" + $DeploymentSlot + ".azurewebsites.net"

Write-Host $ActionHostName

$RoutingRule = New-Object Microsoft.WindowsAzure.Commands.Utilities.Websites.Services.WebEntities.RampUpRule
$RoutingRule.ActionHostName = $ActionHostName
$RoutingRule.ReroutePercentage = $ReroutePercentage;
$RoutingRule.Name = "ProductionRouting"

# Below properties can be used for ramp up or ramp down
#$RoutingRule.ChangeIntervalInMinutes = 10;
#$RoutingRule.ChangeStep = 5;
#$RoutingRule.MinReroutePercentage = 1;
#$RoutingRule.MaxReroutePercentage = 80;

Set-AzureWebsite $WebsiteName -Slot Production -RoutingRules $RoutingRule
}

Write-Host "$WebsiteName : Moving Traffic to Slot - $DeploymentSlot => End"

Happy programming!

Azure App Services hidden Gem: Local Cache feature

May 25, 2016 21:42

Azure App Services: Local Cache feature will help you to make your web application highly available, high performant and resilient to maintenance & upgrades in Azure. Local cache feature can be enabled for any web application running on any platform (.NET, JAVA or PHP). You will see visible signs of the process in terms of performance, response times and reduced number of site failures/downtimes. If your web application has heavy I/O usage then this feature is really helpful. Let's see how Local Cache feature works:

Azure Web App (also known as Websites) is a PaaS (Platform as a Service) offering to host your web applications. It gives you some really nice features like dynamic scaling in terms of the number of instances or machine sizes, sticky sessions, load balancing, traffic routing etc. without worrying about maintenance and patching of the servers.

Let's understand the deployment of Azure Web Apps. You might think, if a website is running on one instance then a single virtual machine is allocated to it or if the website is running on ten instances then ten virtual machines are allocated. This is true but this is not the complete picture. Here is how Azure Web App deployment looks like:

Conceptual Deployment of Azure App Service

Conceptual Deployment of Azure App Service

As shown in diagram, it consists of three components:

  1. Front-end server
    All the web requests are terminated on this server.
    Its job is to check validity of the HTTPS certificate and to forward request to an appropriate worker role to execute the request

  2. Worker role
    This is responsible for hosting the web application
    It will execute the web request and returns the response to the user

  3. Shared network drive
    Website contents are stored on this shared network drive
    Content stored here are shared across all worker roles (VM instances)
    This content can be accessed via FTP or SCM website (KUDU portal)

When you deploy the website, contents are copied to a shared network drive. Worker role hosts application in IIS (assuming it's a .NET application) pointing content location to the shared network drive. This is why, when you scale out your application, it scales out very fast.

This deployment structure works in most of the cases, BUT this does not work in these scenarios:

  • If you want a high performing application
  • If you want a highly available application

Why doesn't it work for the above scenarios?

  • When content is stored at a shared location, there is latency added to access the content.
  • An application is dependent on the availability of the shared network drive. If the connection is lost to shared network drive then it results in application downtime.
  • If a connection to the shared network drive is lost and restored then it results in application restart. If your application is bootstrapping certain data then it could add the further delay in starting the application. For example: If you have an Umbraco application then as part of the start-up process it creates indexes, creates XML file etc. So, it takes time to start the application
  • What we have also observed is that if your application does a lot of disk I/O then frequent storage connection failures might happen which results in application restarts

How do we avoid shared network drive connection failures and make our application highly available and performant?

Answer is: Use "LOCAL CACHE" feature

When you enable your website to use Local Cache feature, each worker role (VM instance) gets its own copy of the website contents. This is a write-but-discard-cache of your shared storage content. It is created asynchronously at the time of the site startup. When the local cache is ready on worker role, the site is switched to run against locally cached contents. This will give you the following benefits:

  • Eliminate latency issues for accessing shared contents
  • Your website is unaffected if shared storage is undergoing through planned upgrades or unplanned downtimes or any other disruptions with shared content store
  • Fewer application restarts because of shared storage issues


How to enable "LOCAL CACHE" feature?

Enabling Local Cache feature is simple. You just need to add two settings to your Application Settings section. These two settings are:

WEBSITE_LOCAL_CACHE_OPTION = Always
WEBSITE_LOCAL_CACHE_SIZEINMB = 300

Local Cache Portal Settings

The default size of a local cache is 300 MB. You can increase it up to 1GB. So the value range will be 300-1000.

Once you save the setting, you need to restart the site. After the restart, platform sees the settings and copies the website contents (D:\home) folder locally on the worker role. Once the content copy is done then the website will be working in Local Cache mode.

Important: Every time web application is restarted, content from shared location will be copied to the worker role machine


Downsides of "LOCAL CACHE" feature

Local Cache feature sounds fascinating and makes your web applications more performant, highly available. But, it has some limitations too. Let's discuss some of those. You need to carefully evaluate your application and deployment process for these limitations.

  • Newly deployed code changes will not be reflected until you restart the site
  • If your web application write logs into the web contents (for example 'App_Data' folder) then these log files will be discarded when the web application is restarted or application is moved to a different virtual machine
  • If you application uploads media file or any other file into web contents then these contents will NOT be shared across all instances (if you have multiple instances) and newly added contents will be discarded when the web application is restarted or application is moved to a different virtual machine
  • If your web application content is > 1GB then you cannot use this feature

To address these limitations, you might need to update your application code. For example: In our case, we changed the code to store media files in a blob storage. When a user uploads a new media file (regardless to which web instance user is connected), it will be stored in the blob storage and hence available to serve from all instances. Also, even if the web application is restarted or moved to a different virtual machine, we are not losing any media files.


Final Thoughts

Local Cache is a very useful feature and a hidden gem of Azure App Service. It gives a performance boost and high resiliency to the web application.

We have seen 100% performance boost in response times for our applications (response time went down from ~250ms to ~120ms) and have not seen storage connection failure issues.

We advise Local Cache feature if your application is ready for it!

Installing Ghost on Azure from GIT

February 19, 2015 21:59

I was looking for a good blogging platform and Ghost is a very good option! Azure has gallery image for Ghost, but there are few disadvantages of using gallery image

  • If you want to customize the contents (for example theme) then its hard
  • There is no functionality of adding comments
  • No Google Analytics integration
  • You can't add your new pages
  • If you add some of the above functionality then you need to do that via FTP, there will be no auto deployment from source control
  • There is no easy way to upgrade to newer version

So, if you want to overcome above issues then you need to fork Ghost source code and work on it!

There are a bunch of articles on how to do that, but some of them are old and some of them don't work on Ghost GIT fork. So, I thought I should document steps which worked for me.

Step 1: Fork Ghost repository

  • Login to GitHub using your GIT credentials
  • Go to Ghost repository https://github.com/TryGhost/Ghost
  • Click on 'Fork' button
  • Once Fork operation is done, you will see Ghost repository under your GitHub account

Step 2: Clone forked repository

Open Git command prompt on your machine and run below command (Assuming GIT is installed on your machine)

> git clone git@github.com:<Your GitHub handle>/Ghost.git

Step 3: Compile Ghost code

Please make sure that you have NodeJS installed on your computer. To check this open command prompt and run command node -v If it returns value then you are fine else you need to install node first

Run below commands to build the code

> npm install -g grunt-cli  // This will install Grunt
> npm install                // This will install all Ghost dependencies
> grunt init                // Compile JS and express web application

Step 4: Test locally

To test locally just run below command

> npm start                    // This will start node application

This will run an application in development mode and on port 2368. So, application URL will be http://localhost:2368

Step 5: Compile contents for Production

To compile files for Production, run below command

> grunt prod                // Generates and minifies the JavaScript files

This will generate necessary files for Production

Step 6: Add config.js file

If your repository does not haveconfig.js file then copyconfig.example.js file and rename it toconfig.js.

Also, you need to update production settings from the file as follows

production: {
    url: '<YOUR WEBSITE URL>', // For example http://test.azurewebsites.net
    mail: {},
    database: {
        client: 'sqlite3',
        connection: {
            filename: path.join(__dirname, '/content/data/ghost.db')
        },
        debug: false
    },

    server: {
        // Host to be passed to node's `net.Server#listen()`
        host: '127.0.0.1',
        // Port to be passed to node's `net.Server#listen()`, for iisnode set this to `process.env.PORT`
        port: process.env.PORT
    }
},

Make sure that you are updating the port value to process.env.PORT. This is important Else it will NOT work after deployment to Azure.

Step 7: Add server.js file

Azure websites work on IIS, so to specify this is NodeJS application, we need to addserver.js file at the root. So, create a new JS file with nameserver.js and add below contents to it

var GhostServer = require('./index');

Step 8: Update .gitignore file

By default Ghost repository ignores below files which are required to run application correctly on Azure website

  1. config.js
  2. /core/built
  3. /core/client/assets/css

So, remove above lines from the.gitignore file

Step 9: Add 'iisnode' configuration file

When Azure deploys the application from GIT, it will create iisnode.yml file. If you want to tell IIS to capture the output and error messages, then you need to update this file. You can do this by connecting via FTP and modify the file. BUT I prefer to add that as part of a repository so that Azure GIT deployment will not override modified file after each deployment.

So, create file iisnode.yml at the root level. Add below lines in the file

loggingEnabled: true
devErrorsEnabled: true
logDirectory: iisnode

Now, IIS will create a directory with name iisnode and log output and errors.

Step 10: Commit & Push changes

After making all above changes, commit those and push it to GitHub repository. To do this run following commands

> git add .
> git commit -am "<Commit message>"
> git push origin master

Step 11: Create Azure website with GIT deployment

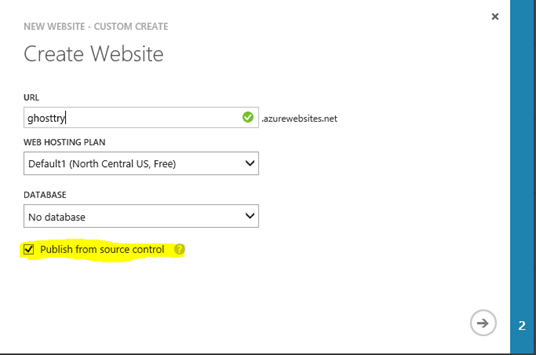
  1. Choose 'Custom Create' option for website. So that we can configure GitHub for deployment 
    Website Options
  2. Enter unique website name & check 'Publish from source control' checkbox
    Choose source control option
  3. Select 'GitHub' option
    Choose GitHub repository
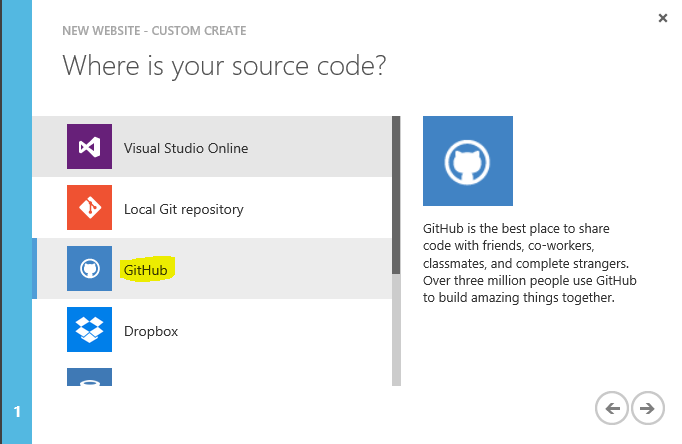
  4. Enter your credentials and GitHub will show you the repositories and its branches. Choose appropriate repository and branch

    Choose repository & branch

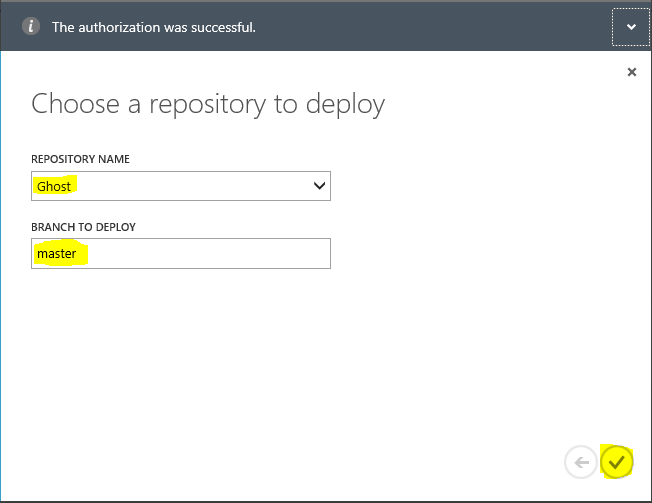
    Click on 'Done' arrow

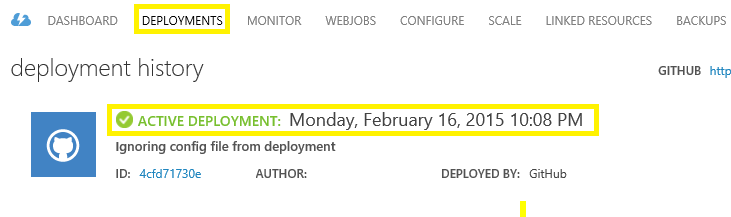
Deployments tab will now appear and Azure website will start the deployment. Once deployment is done it will show successful message like

Website Deployment

Step 12: Change Website configuration

We need to set NodeJS configuration variable in website configuration. To do this click on Configure tab in Azure website and scroll down to app settings section. Add app setting with name NODE_ENV with value production

Settings will look like

App Settings

DON'T miss to click on Save button at the bottom & restart the website

YOU are ALL SET!! Access your website now and Ghost should be running fine. If it gives HTTP 500 error, let's refresh one more time and you should be good to go!

After this whenever you make a change and push changes to the appropriate branch, Azure will automatically detect the changes and redeploy the website!

You have full control of Ghost now. You can update contents & add new pages using your favorite editor. You can now integrate comment provider of your choice and integrate Google Analytics too!

If you have any questions or face issues then please post them as a comment.

Happy Blogging!